To join a new ball of yarn in the middle of a project, there are a few different methods available when it’s not possible to join along a selvage edge that will get hidden. Using knots in the middle of a row or round is not ideal because knits stretch, and the knots can get pulled to the right side of the work, so most knitters prefer other methods. Here are three of our favorite methods to join yarn and what projects to use them on!
Knitting in New Yarn
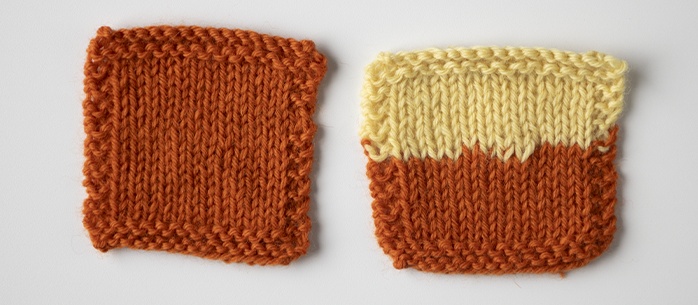
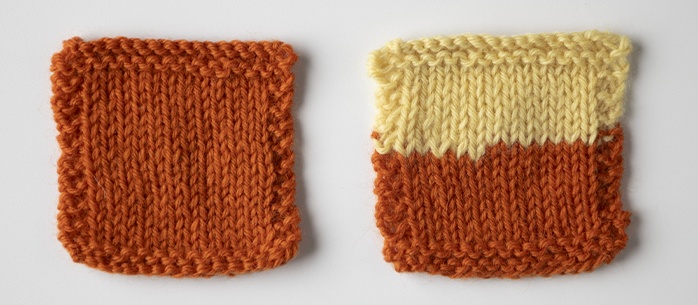
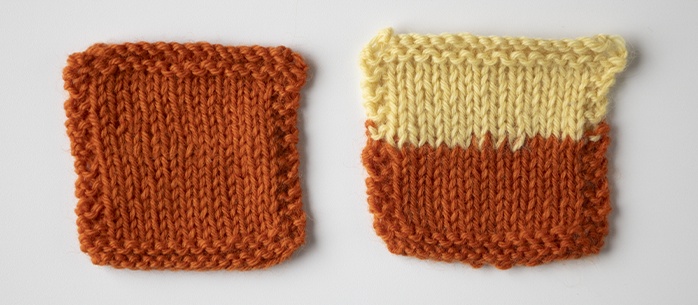
The most beginner-friendly way to join a new yarn mid-project is by using the knitting in method. Quite simply, it involves knitting with your new and old yarn held together for a few stitches to secure the new yarn without knots. This method works with all fiber types and it requires no tools, making it a great choice for many projects, but it can cause visible tension differences, so it’s not recommended for use in a highly visible place on a project or with super bulky yarn.
1. Take your working yarn and your new ball of yarn and overlap the ends by 4-6 inches, with the end of new yarn extended past the most recent stitches knit.
2. Hold the end of the new yarn against your right needles to help maintain a similar tension to your old yarn.
3. With the two yarns held together, work 3-5 stitches together. For grippy yarns like wool, fewer stitches can be worked because there’s less risk of ends worming out. Worming is when yarn works itself loose and ends wiggle out to the right side of the project. For smoother yarns like mercerized cotton, a few more stitches will offer more security so any ends that worm out can be trimmed without damaging the join.
4. On the following row, work into the double stitches as single stitches, capturing both the new and old yarn.
5. The ends may shift during the blocking process, so for the best results, block before trimming the yarn.
Russian Join
The Russian Join is a popular method to join a new ball that works with plied yarn of any fiber type. Yarn is woven back into itself through the existing plies of the first yarn to create a small loop, and then the new yarn is passed through the loop and woven back into itself to connect the yarns. The Russian Join offers a little more subtlety and security than the knitting-in method because the double yarn gets compressed through the weaving process and worming is prevented. This is the strongest of the three methods and a great choice for projects that will be heavily stretched.
1. When there are 5-6 inches of the old yarn remaining, insert the end through a yarn needle with a 2-inch tail.
2. Turn the needle back to the remaining yarn, and weave the needle in and out between the plies for 1-2 inches.
3. Carefully pinch the yarn where it passes through the eye of the needle and pull the needle and remaining tail through, leaving a small loop at the top.
4. With the new yarn, insert the new end through the yarn needle with a 2-inch tail.
5. Pass the yarn needle and tail through the small loop created using the older yarn.
6. Turn the needle back to the remaining new yarn, and weave the needle in and out between the plies for 1-2 inches.
7. Pull the needle and tail through until it’s created a snug loop.
8. If the tail on the older yarn is accessible, pull it to close the small loop that remains.
9. Work with your joined yarn as if it were normal yarn, and trim any remaining tails when it’s convenient.
Felted Join (AKA Split Splice)
The Felted Join’s name hints at what it is and when it can be used. It involves felting together two ends of slightly overlapped yarn using either water or spit and the friction of your yarns. It’s one of the most invisible joins to choose from, but sadly it can only be used with non-superwash wools and other feltable animal fibers. It’s a very convenient joining method because it involves no extra tools other than a liquid, and although using spit sounds a little gross, it has extra benefits because the enzymes in saliva helps speed up the felting.
1. Dip 1-2 inches of both your new yarn and the end of your old yarn in a glass of water or spit on them in your palm and rub the liquid in.
2. Lay the two ends in your palm in opposite directions with an overlap of 1-2 inches.
3. Place your other palm on top, and briskly rub your hands together so the yarns roll in between and create friction.
4. When your hands start to feel hot, pause and check your work to see how the felted join has progressed. If the yarn ends are still clearly separate, repeat the rubbing process.
5. When the ends look melded together, gently tug to confirm the join’s strength.
6. Work with your joined yarns as if they were normal yarn. When the join is knitted into the project, it will be extra secured. There should be no ends to trim.