
Basic Knit Stitches
Brand new to knitting? You've come to the right place! Work your way through these four tutorials, and you will be ready to rock your first knitting project – from start to finish.
Casting On
For any knitting project, the first step will be to cast on your stitches. This process creates the foundation row of active stitches on your needle. In knitting patterns, you’ll often see the instructions for a cast on abbreviated as CO.
The most common cast on is the Long Tail Cast On. This is a great cast on for learning to knit – it’s fast, efficient, and neat, once you get the hang of it.
To start the Long Tail Cast On, you’ll need to leave a “long tail” that will accommodate the stitches you will be making. A good rule of thumb is to use a yarn tail that is roughly three times the width of your knitting project.
For example, if you want your knitted piece to be 10" wide, you’ll need a yarn tail that measures 30" long plus 6" more for weaving in at the end.
Before you begin casting on, make a slip knot on your right needle, leaving the appropriate length of yarn for the tail.
How to Make a Slip Knot:
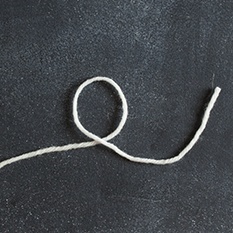
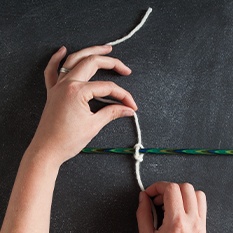
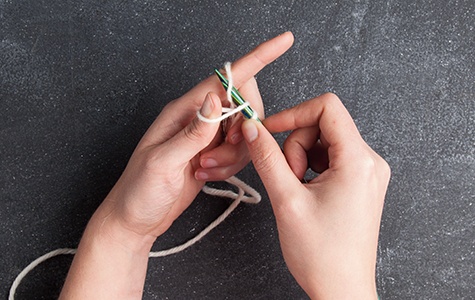
1. Measure a length of yarn based on how wide your project will be and make a loop.
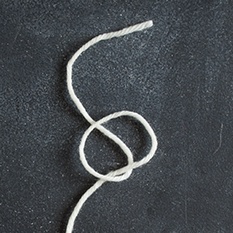
2. Take the yarn tail that is crossing over the front of the loop and place it behind the loop as shown.
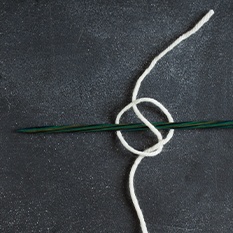
3. Place your needle underneath the bar of yarn that is in the middle of the loop.
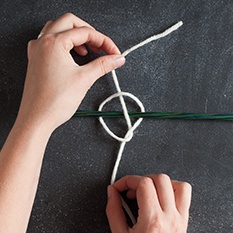
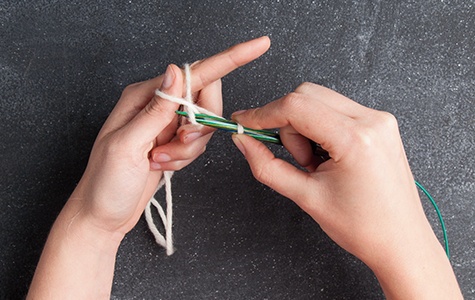
4. Grab both ends of the yarn of your slip knot, making sure that the needle stays in place.
5. Gently tug on the yarn ends to tighten the slip knot around your needle.
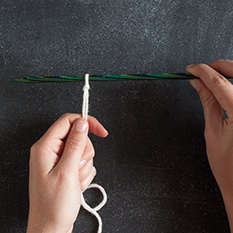
6. Hold the needle in your right hand with the needle tip pointing to the left.
Make sure that the slip knot is not sitting on your needle too tightly; you want to be able to move it back and forth easily. You are now ready to begin casting on!
Long Tail Cast On:
Step One
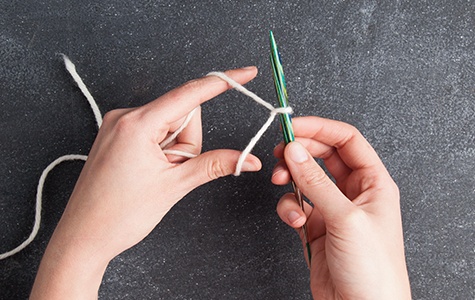
Grasp the two yarn ends below the slip knot in your left hand. Push your left-hand thumb and forefinger through the two strands. The long tail should be lying over your thumb.

Step Two
Spread the fingers apart and lower the needle so that the yarn makes a V between the thumb and forefinger. You can use the forefinger of your right hand to hold the slip knot on the needle.

Step Three
Put the needle tip under the outside strand of yarn around your thumb.
Step Four
Then, put the needle tip over and behind the yarn that is on your forefinger.
Step Five
Next, move the needle tip back through the opening of the yarn around your thumb.

Step Six
Draw the thumb out from the yarn loop and tug lightly on the yarn tails to tighten up your stitch.
Repeat Steps three through six until you have cast on the required number of stitches. Congrats, you just finished casting on your first project!
Are you a visual learner?
Other Cast On Techniques
While the long tail cast on is the most widely-used because it's relatively easy and looks great, there are all kinds of different cast on techniques to choose from! What you are making, what yarn you are using, and how stretchy you want the cast on to be are all things to consider when choosing a cast on method.
View All Cast On Techniques »You mastered casting on! Continue to work your way through these tutorials, and you'll be knitting in no time!