Row 9: P1, M1R P-wise, P to 1 st before end...
End of Row 10 total stitch count: 132 (132, 136, 140, 144, 148, 160, 164, 164) sts.

Row 9: P1, M1R P-wise, P to 1 st before end...
End of Row 10 total stitch count: 132 (132, 136, 140, 144, 148, 160, 164, 164) sts.
Finished Measurements
40.25 (44.25, 48.25, 52.25, 56.25, 60.25, 64.25, 68.25, 72.25)" finished bust circumference; meant to be worn with 10" positive ease
[Note: numbers on schematic were correct; info page was updated to match schematic.]
Chart D
Row 16, column 3 stitch should be a purl stitch
AHMRA' n GRA' - 50438
Revised 08/1/08
All sizes: Work in Rib and Cable pattern until piece measures 2.5" and ending with completion of an odd numbered row of Chart A.
Body (all sizes): [Moss St 3 (3, 4, 6, 8); (Chart A, Moss St 3) 1 (2, 2, 2, 2) time(s); Chart B, Moss St 3; (Chart A, Most St 3) 2 times; Chart B; Moss St 3 (3, 6, 6, 6), Chart C, Moss St 3 (3, 6, 6, 6); Chart B, Moss St, (Chart A, Moss St 3) 2 times, Chart B, Moss St 3, (Chart A, Moss St 3) 1 (2, 2, 2, 2) time(s), ending with Moss St 3 (3, 4, 6, 8).] Rep from [ to ] 1 time.
Sleeve Medium: P2tog, k2tog, p2tog, repeat from * to * as in X-Small above, p2tog, k1, p1, k1. (50 sts)
Body:
Rep Dec Rnd every 22nd rnd 5 more times. 216 (228, 244, 264, 284, 308, 332) sts.
Back
Left Shoulder
Seed Stitch Version Only
Next RS Row: Work in pattern until 1 st before 1st M, KFB, remove 1st M, K1, pass the newly-created st over, BO loosely to 2nd M, remove M, K1, pass the previous st over, work in pattern to end.
Next and Following WS Neckline Shaping Rows: Work in pattern as established until 1 st remains at neck edge, Sl 1.
Dec Row (RS): Sl 2, PSSO, work in pattern as established to end. 1 st dec.
Chart Legend:
(P1, K1, P1) in 1 st
Purl 1, Knit 1, purl 1 all in 1 st to make 3 sts from 1
Separate for Sleeves (resume all sizes)
K to first M, remove M, place next 56 (60, 66, 72, 76)(80, 88, 98, 106) sts on st holder or scrap yarn, remove next M, CO 8 (10, 10, 8, 14)(14, 15, 16, 18) sts using Backwards Loop Cast On, K88 (94, 102, 120, 122)(130, 144, 152, 158), remove M, place next 56 (60, 66, 72, 76)(80, 90, 98, 106) sts on st holder or scrap yarn, CO 8 (10, 10, 8, 14)(14, 15, 16, 18) sts using Backwards Loop Cast On, remove M, K44 (47, 51, 60, 61)(65, 73, 76, 79). 192 (208, 224, 256, 272)(288, 320, 336, 352) sts.
10/9/2019
Fully updated October 2019, with all errata corrected.
revised 4/29/09
Needles:
S 3 (3.25 mm): Circular needles in length appropriate to your preferred round knitting method.
Directions:
Ear Flaps:....
With color A and using the knitted CO, CO 16 sts. Turn work. Pick up Left Earflap and hold it with RS facing. Holding the CO sts in your right hand, continue the row by knitting across earflap. Turn work and CO 64 sts. Turn again, and, with RS facing, attach Right Earflap in same manner as left. Turn work and CO 16 sts: 160 sts. Turn work, PM and join in the round.
ANDEAN TREASURE VEST - 50541
Revised 2/22/06
Gauge: 6 sts/7 rows = 1" using size 5 (3.75mm) needles over Fair Isle pattern. Check your gauge before you begin.
Back
......
Row 5: K1, (Sl1 WYIB, P3) to last 5 sts, K2tog, M1, K3.
After joining the fronts and back, the Set-up row (WS) should read:
Set-up row (WS): Work pat as est for 36 (39, 44, 49, 55, 59) sts, PM, P84 (92, 102, 108, 118, 124) sts, PM, cont pat as est in last 36 (39, 44, 49, 55, 59) sts
Part 1 AND Part 2
Row 1: (K1, P1) three times, K1, Sl1.
Increase Section
Row 28: Rep Row 24.
Whale
Rnd 29 (K2tog, K15, SSK) twice. (34 sts)
Rnds 30-33: Knit.
Bear
Row numbering after round 56 corrected.
Revised 7/18/13
Added info to legend:
Knit RS: knit stitch
WS: purl stitch
SSK RS: Slip one stitch as if to knit, Slip another stitch as if to knit. Insert left-hand needle into front of these 2 stitches and knit them together WS: Purl two stitches together in back loops, inserting needle from the left, behind and into the backs of the 2nd and 1st stitches in that order
K2tog RS: Knit two stitches together as one stitch WS: Purl 2 stitches together
Revised 9/24/13
Waist Decreases: Work a Decrease Round every 7th (8th, 9th, 10th, 10th, 8th, 9th, 9th, 10th) round 10 (9, 9, 9, 10, 13, 11, 11, 10) times. Work in plain Stockinette stitch for 14 (12, 9, 10, 9, 14, 15, 15, 12) rounds. 184 (208, 228, 256, 284, 300, 332, 360, 388) sts total.
Armhole
Sizes 32 (36.5, 39.5, 43.5, -)(-, -, 61, 65)" Only
Next Row (RS): K2, work as established to last 4 sts, K1, P1, K2.
Next Row (WS): Sl1 WYIF, P1, K1, P1, work as established to last 2 sts, P1, K1.
...
Sizes - (-, -, -, 48)(52.5, 56.5, -, -)" Only
Next Row (RS): K2, work Row - (-, -, -, 17)(1, 17, -, -) of Right Armhole Extension Edge, work as established to last 4 sts, K1, P1, K2.
Next Row (WS): Sl1 WYIF, P1, K1, P1, work as established to last 12 sts, work Row - (-, -, -, 18)(2, 18, -, -) of Right Armhole Extension Edge, P1, K1.
Revised 3/17/09
Foot
Set-up Row: K1, m1, k14, m1, k14, m1, k31 (63 sts. 33 sts for instep and 30 sts for sole.)
under Cable Panel instructions:
Row 4: Rep row 2
Row 5: Rep row 3
Row 6: Rep row 2.
Under Notes:
WS rows in between decrease rows should be worked as foll: P2, pat to last 2 sts, p2
revised 7/22/08
Body
With MC, cast on...........
Sleeves
With MC and smaller...........
Knit 3" of K2,P2 ribbing.
Change to larger needles
Sleeve Increases
Using MC increase as follows:
Garter Stitch Front Bands
With MC and a 32" circular...............
Revised 3/24/09
Begin Color Patterns:
You are now going to set aside approximately 6" of stitches in the front to shape a square neck on the cardigan.
Slip the last 20 (22, 24, 26, 28, 30) stitches, the 7 steek stitches and the first 20 (22, 24, 26, 28, 30) sts of the round to a piece of scrap yarn or stitch holder. (This ensures that the pattern will mirror itself after you cut the neck shaping steek.) Break off the yarn, leaving a 3" tail to weave in later.
Using the backward loop method, cast on the 7 stitches you need to continue the steek. You will have a funny looking "kangaroo pouch," but it will shape up once you cut both sections of steeking later. Now you can finish knitting the last 3" of the body.
Knit one round in the current heather color, being sure to cast off the steek stitches here.
After binding off the steek stitches, separate the garment into sections: place 44 (48, 55, 62, 69, 73) stitches on a piece of scrap yarn for the right front, 143 (155, 173, 191, 209, 221) stitches on a separate strand of scrap yarn for back, and 44 (48, 55, 62, 69, 73) stitches on a separate piece of scrap yarn for the left front.
Joining the sleeves to the body
Starting at the outer shoulder edge and working toward the neck, skip the first four sts on both front and back (8 sts total), then place 40 (44, 51, 58, 65, 69) stitches from the back onto a working needle. Do the same for the left front.
Using 3-needle bind off (see http://community.knitpicks.com/notes if you are unfamiliar with this technique), join the front and back together at the shoulders. Repeat for the right side. There should now be 8 open sts at each shoulder corner; these will act as the armscye steek. There are 55 (59, 63, 67, 71, 75) sts remaining across the back neck.
Yarn Requirements
Size: 32 (36, 40, 44, 48, 52, 56, 60, 64)
MC: 4 (5, 5, 6, 7, 8, 9, 10, 11)
CC: 1 (1, 1, 2, 2, 2, 2, 2, 2)
First paragraph under Front:
....ending with a RS row.
Under Notes:
the Plait Cable should be "worked flat over a multiple of 9 sts"
Under Body, after switching to Size 10 needles and setting up cable pattern (pg 4, top paragraph of the single pattern):
Next Row (RS): K2, p4, k2, p1 (2, 2, 3, 3, 3, 3, 4, 4), k9, p8 (9, 9, 9, 9, 9, 10, 10, 11), k4, p8 (10, 14, 18, 9, 9, 10, 10, 11), k0 (0, 0, 0, 9, 9, 9, 9, 9), p0 (0, 0, 0, 4, 9, 10, 14, 16), PM to mark left front, p1 (3, 7, 11, 4, 9, 10, 14, 16), k0 (0, 0, 0, 9, 9, 9, 9, 9), p0 (0, 0, 0, 2, 2, 3, 3, 4), k9, p8 (9, 9, 9, 9, 9, 10, 10, 11), k4, p8 (9, 9, 9, 9, 9, 10, 10, 11), k9, p8 (9, 9, 9, 9, 9, 10, 10, 11), k4, p8 (9, 9, 9, 9, 9, 10, 10, 11), k9, p1 (3, 7, 11, 2, 2, 3, 3, 4), k0 (0, 0, 0, 9, 9, 9, 9, 9), p0 (0, 0, 0, 4, 9, 10, 14, 16), PM to mark back, p1 (3, 7, 11, 4, 9, 10, 14, 16), k0 (0, 0, 0, 9, 9, 9, 9, 9), p7 (7, 7, 7, 9, 9, 10, 10, 11), k4, p8 (9, 9, 9, 9, 9, 10, 10, 11), k9, p1 (2, 2, 3, 3, 3, 3, 4, 4), k2, p4, k2. 38 (42, 46, 51, 55, 60, 63, 68, 72) sts for each front and 69 (77, 85, 93, 101, 111, 119, 127, 137) sts for the back.
Under Body, beginning of cable pattern:
Next Row (RS): K2, p4, k2, p1 (2, 2, 3, 3, 3, 3, 4, 4), work Row 1 of Plait Cable, p1 (2, 2, 2, 2, 2, 3, 3, 4), work Row 1 of Diamond Cable, p1 (3, 7, 11, 2, 2, 3, 3, 4), work Row 1 of Plait Cable 0 (0, 0, 0, 1, 1, 1, 1, 1) time(s), p0 (0, 0, 0, 4, 9, 10, 14, 16), SM, p1 (3, 7, 11, 4, 9, 10, 14, 16), work Row 1 of Plait Cable 0 (0, 0, 0, 1, 1, 1, 1, 1) time(s), p0 (0, 0, 0, 2, 2, 3, 3, 4), work Row 1 of Plait Cable, p1 (2, 2, 2, 2, 2, 3, 3, 4), work Row 1 of Diamond Cable, p1 (2, 2, 2, 2, 2, 3, 3, 4), work Row 1 of Plait Cable, p1 (2, 2, 2, 2, 2, 3, 3, 4), work Row 1 of Diamond Cable, p1 (2, 2, 2, 2, 2, 3, 3, 4), work Row 1 of Plait Cable, p1 (3, 7, 11, 2, 2, 3, 3, 4), work Row 1 of Plait Cable 0 (0, 0, 0, 1, 1, 1, 1, 1) time(s), p0 (0, 0, 0, 4, 9, 10, 13, 16), SM, p1 (3, 7, 11, 4, 9, 10, 14, 16), work Row 1 of Plait Cable 0 (0, 0, 0, 1, 1, 1, 1, 1) time(s), p1 (2, 2, 2, 2, 2, 3, 3, 4), work Row 1 of Diamond Cable, p1 (2, 2, 2, 2, 2, 3, 3, 4), work Row 1 of Plait Cable, p1 (2, 2, 2, 2, 2, 3, 3, 4), k2, p4, k2.
Revised 1/12/2010
Teen hoodie
Armhole and neck shaping
BO 4 (4, 6, 8) sts at beginning of next 2 rows. Work even until armhole measures 6½”(7”, 7½”, 8”), ending with a WS row.
Next RS row: Work 19 (24, 26, 27) sts; place next 23 (21, 21, 23) sts on holder. Joining a second ball of yarn, work rem 19 (24, 26, 27) sts. Dec 1 st at neck edge every row twice: 17 (22, 24, 25) sts rem.
Back shoulders should continue with 17 (22, 24, 25) sts.
Right and left front shoulders should end with 17 (22, 24, 25) sts remaining.
Mom's Cardigan
Shoulder shaping
Right shoulder (begin on a RS row):
K 12 (14, 14, 16); wrap next st, turn work, p 12 (14, 14, 16).
K 8 (10, 10, 12); wrap next st, turn work, p 8 (10, 10, 12).
K 4 (5, 6, 7); wrap next st, turn work, p 4 (5, 6, 7).
K 18 (19, 19, 20) sts, picking up wraps and working them together with the sts associated with them.
Shoulder shaping
Left shoulder (begin on a WS row):
P 12 (14, 14, 16); wrap next st, turn work, k 12 (14, 14, 16).
P 8 (10, 10, 12); wrap next st, turn work, k 8 (10, 10, 12).
P 4 (5, 6, 7); wrap next st, turn work, k 4 (5, 6, 7).
P 18 (19, 19, 20) sts, picking up wraps and working them together with the sts associated with them.
Updated 3/20/08
For a step-by-step demonstration of the Wildflower Stitch, see the PDF Wildflower Stitch Details.
Girl's Polo - Back, after 1" stockinette: Next Row (RS): K1, *k2tog, yo*; rep to last 2 sts, k2.
Girl's Polo - Shape sleeve cap BO 3 sts at beg of next two rows: 31 (33, 35, 51) sts rem. Dec 1 st at each end of every 3 rows 8 (10, 9, 10) times, then every other row 6 (5, 7, 12) times.
Mom's Cardigan - Right Front armhole and neck shaping, after it measures 5"(5", 5", 6"): With WS of work facing, work 22 (28, 33, 29) sts; (do not slip any stitches to holder). Dec 1 st at neck edge (right end) every row 4 (9, 14, 9) times: 18 (19, 19, 20) sts rem.
Mom's Cardigan - Left Front armhole and neck shaping, after it measures 5" (5", 5", 6"): With WS of work facing, work 22 (28, 33, 29) sts; (do not slip any stitches to holder). Dec 1 st at neck edge (left end of RS) every row 4 (9, 14, 9) times: 18 (19, 19, 20) sts rem.
Mom's Cardigan - Shape Cap BO 4 (4, ,5, 5) sts at the beg of next two rows: 43 (49, 53, 55) sts rem. Dec 1 st at each end of every 3 ( 2, 2, 3) rows 5 (5, 5, 8 ) times, then every 4 (3, 3,4) rows 3 (5, 8, 1) time(s) , then every 3 (2, 2, 3) rows 5 (5, 4, 8 ) times: 17 (19, 19, 21) sts. BO loosely.
Mom's Cardigan - Collar: With smaller needles, and the RS of work facing, pick up and knit 73 (85, 89, 95) sts around the neck of the sweater. (there should not be any sts from holders)
Center Panel
Using a provisional cast on method, CO 82 sts
Update 07/17/2017
Lace Edging
CO 17 sts
Chart - Austen Edging
Corrections made to match written instructions
Legend -
Added Purl symbol
Yoke Increases
Inc Rnd: K to M, SM, K1, M1R, K to 1 st before M, M1L, K1, SM, K to next sleeve M, SM, K1, M1R, K to 1 st before M, M1L, K1, SM, K to end. 4 sts inc.
Christmas Elf
Arms
Rnd 1: Using C1 and starting in marker from st #19 on Rnd 42, PU 4 sts, 1 st per st. Slide sts to cable to set up for Magic Loop Method and heading opposite direction PU same 4 sts one rnd up. 8 sts. Be sure beg of rnd is to back of body to minimize jogs of in the round stripes. First st picked up is first st of rnd. PM to indicate beg of rnd and beg to work in rnd using Magic Loop Method:
Rnds 2-48: Knit all sts in 4 C1, 4 rnds MC stripe pattern.
Rnd 49: Switch to C2 for the hand until the end. KFB all sts (16 sts)
Rnds 50-59: Knit all sts. Place removable markers as you work:
Rnd 51: in st #8 to mark for thumb. Rnd 53: in st #9 to mark for thumb.
Rnd 60: K2tog eight times (8 sts) Stuff hand.
Cut yarn, leaving a generous tail and use Kitchener Stitch to close.
Round Christmas Monster
Rnd 60: (K1, SSK, K5, K2tog, K1) twice (18 sts).
Pattern has been updated.
This pattern was entirely updated (re-edited, new photos and layout) in September 2022.
Revised 6/23/2016
1x1 ribbing (worked in the round) section should not have had Round 2. The pattern should read: Round 1: *K1, P1,* rep from * to end of round.
Under Notions, a Pom-Pom Maker with diameter of 3 3/8 (85mm) has been added to make the optional pom-pom.
revised 6/4/08
Needles:
US 7 (4.5mm): 24" circular or straight
US 7 (4.5mm): dpn's
Yarn:
MC: Ivory 24164, 2 balls
Spare US 7 (4.5mm): for 3 needle bind off
Neckband
total stitches: 58 (66, 78) sts
revised 9/9/2010
Greta Garbo Chart
Row 34, stitch 14, should be Knit.
Karukell chart
Chart should begin on a WS row.
Stitch Pattern 1, Row 2 (WS): P2, (K1, P1) three times, K7, P4, K7, (P1, K1) 14 times, P1, K7, P4, K7, (P1, K1) three times, P2.
Stitch Pattern 2, Row 13: K8, P5, 2/1 RPC, P2, 2/1 LPC, P5, K29, P5, 2/1 RPC, P2, 2/1 LPC, K8.
Stitch Pattern 2, Row 15: K8, P4, 2/1 RPC, P4, 2/1 LPC, P4, K29, P4, 2/1 RPC, P4, 2/1 LPC, P4, K8.
Revised 6/15/2016
The Toe and Heel sections have been re-written for clarity, and four missing symbols were added to the legend. Please contact Customer Service (customerservice@knitpicks.com) for an updated version of the pattern.
Revised 10/7/2016
Clarified that mentions of the Coin Cable chart in the Body and Sleeve sections are referring to the Coin Cable Repeat chart.
Revised 01/17/2017
Legend
Removed references to RS/WS under Knit Stitch, Purl Stitch, k2tog and ssk
Shape Sleeve Cap and Saddle
Size 37.25
"...BO 4 sts loosely at beginning of next 2 rows...
See updated version in your library for multiple changes. If you have questions, contact Customer Service at 1(800) 574-1323.
Revised 11/30/2022
Pattern has been completely updated, please download a new copy from your pattern library.
7/9/2014
See updated version in your library for multiple changes. If you have questions, contact Customer Service at 1(800) 574-1323.
12/4/2017
Top Decreases
Round 1: K1, K2tog, K to last 3 sts of first half, SSK, K1; repeat on second half. 4 sts decreased.
Finishing
Sew underarm seams.
The second time the subheader Right Shoulder Shaping appears should be Left Shoulder Shaping.
Chart Legend
2/1 RCP and 2/1LCP should read 2/1 RPC and 2/1 LPC, respectively. Instructions are correct
Revised 9/29/2014
Row 5 and 6 in the Ears section are incorrect. They should read:
Row 5: BO 1 st, k7, BO 1 st.
Row 6: BO 1 st pwise, p5, BO 1 st pwise.
Needles
US 6 (4mm) DPNs, or preferred method for working in the round, or size to obtain gauge.
US 8 (5mm) DPNs or preferred method for working in the round, or or 2 sizes smaller than gauge needle
Gauge
12.5 sts and 23 rows = 4” in Bee Stitch pattern on size 6 needles, blocked.
Hat
CO 88 sts.
Revised 6/11/2013
Pleat Decrease Rows
All Pleats should be worked by slipping 3 sts and working together as pattern states with 3 sts from working needle.
Cast On 52 stitches
Yoke
Row 4 of the should read:
Work in pat as est to first marker, SM, k4, k2tog 0 (0, 1, 0, 1, 1, 1), k 154 (174, 192, 210, 224, 248, 268), ssk 0 (0, 1, 0, 1, 1, 1), k4, work in pat as est to end. 184 (204, 224, 240, 264, 288, 308) sts.
Row numbering change:
Row 9, and 11: With CA, knit
Row 10, and 12: With CA, k2, purl to last 2 sts, k2.
Finished Measurements
9.5 x 8”
Gauge
18 sts and 40 rows = 4” over Belted Stripes pattern, blocked.
End of pattern
Rep rows 1-16 another 3 times. Work rows 1-4 another time.
Decrease Section
Set up the decrease section by working (k2tog, k43) twice.
Under gauge:
24 sts and 32 rows = 4” in St st using smaller needle, blocked.
24 sts and 32 rows = 4” in Wavy Lace pattern using smaller needle, blocked.
Under Sleeves:
Set-up: With RS facing and beginning at the center of underarm, PU 72 (76, 80, 84, 88, 92,100, 112, 118, 126)...
Set-up Rnd: K12 913, 14, 14, 15, 16, 17, 19, 20, 21) sts, PM A….K13 (15, 16, 16, 17, 18, 18, 20, 22, 23) sts...
Work Sleeve Dec Rnd every 4th end 3 times total. 66 (70, 74, 78, 82, 86, 94, 106, 112, 120) sts rem….
CO should be 41 sts.
1/14/2020 (this note is missing in first book printing only):
For Right Twist Cable and Left Twist Cable charts, repeat Pattern Repeat stitches 5 (7, 8, 10, 11, 12) times for Body.
5/4/2020:
Stitches 12 & 15 in Row 1 of Center Cable Chart are purl stitches.
7/15/2020:
yarn skein requirements: 19 (21, 24, 28, 32, 37) skeins
8/20/2020:
Collar
Row 1 (WS): K1, P2, work Left Twist Cable to last 3 sts, P2, K1. (see below)
11/18/2021:
Collar
Row 1 (WS): P1, K2, work Left Twist Cable to last 3 sts, K2, P1.
Row 2 (RS): K1, P2, work next row of Left Twist Cable to
last 3 sts, P2, K1.
Divide Front and Back
...
Place 83 (93, 101, 111, 119, 129, 139) Front sts on scrap yarn or spare needle. Cont working 83 (93, 101, 111, 119, 129, 139) Back sts.
Back
Setup Row (WS): P19 (19, 23, 28, 27, 32, 37), PM, P45 (55, 55, 55, 65, 65, 65), PM, P19 (19, 23, 28, 27, 32, 37). These Ms will indicate strap placement later.
Revised 3/7/2013
Back
Continue upper portion of Back as follows:
Work 12 (10, 24, 19, 17, 16, 18, 18, 15) rows in pattern.
Botanical Border
Row 79: K1, K2tog, YO, *SSK, YO, K1, YO, KB, K4, K2tog, K1, SSK, K4, KB, YO, K1, YO, K2tog; rep from * to last 3 sts, YO, SSK, K1.
Chart is updated to match, with the two center decreases added.
Blue Pine Jacket - 50713
Revised 2/6/09
Begin short row shaping for RS seam
Knit 12 (13, 14, 15, 15, 15) st: wrap next stitch and turn work;
p 12 (13, 14, 15, 15, 15) st.
Next Row: k 24 (26, 28, 30, 30, 30) st; wrap next stitch and turn work;
p 24 (26, 28, 30, 30, 30) st.
Next Row: k 12 (13, 14, 15, 15, 15) st: wrap next stitch and turn work;
p 12 (13, 14, 15, 15, 15) st.
K 1 row, P 1 row.
K 2 rows.
Repeat rows 1 - 6, 27 (29, 31, 33, 35) times, to rib across back.
Begin short row shaping for left side seam
Knit 12 (13, 14, 15, 15, 15) st: wrap next stitch and turn work;
p 12 (13, 14, 15, 15, 15) st.
Next Row: k 24 (26, 28, 30, 30, 30) st;
wrap next stitch and turn work;
p 24 (26, 28, 30, 30, 30) st.
Next Row: k 12 (13, 14, 15, 15, 15) st:
wrap next stitch and turn work;
p 12 (13, 14, 15, 15, 15) st.
K 1 row, P 1 row.
K 2 rows.
Repeat rows 1 - 6, 12 (13, 14, 15, 16) times, to rib across left front.
Work rows 1-4. Cast off.
Chart Legend: KFB changed to "Knit into the front and back of the stitch (for both RS and WS)"
Main Chart: Column 38, Rows 1, 3, and 5 are Knit; Column 37, Rows 1, 3, and 5 are YO. Column 1, Row 24 is KFB.
Row 17 (RS): K2, SSK, K to last 4 sts, K2tog, K2.
Next Row (RS): K1, K2tog twice, K1. 4 sts.
Next Row (WS): K1, K2tog, K1. 3 sts.
Cape
At end of Row 11 (13, 13) turn, CO 10 (10, 14) new sts, turn to RS
See updated version in your library for multiple changes. If you have questions, contact Customer Service at 1(800) 574-1323.
Revised 1/7/2015
In the Armholes section, the last paragraph after all of the size instructions should read: "For all sizes: Work as established to end of Shape Neckline instructions. Work a WS row if necessary before proceeding to Short Rows."
Revised 3/11/2020
St counts remaining after Shape Neckline have been removed, as other shaping happens at the same time.
Pattern has been updated with the order of sections moved around to try to making following pattern more clear.
Revised 8/6/2014
Mosaic Chart updated, and instructions added for sewing the small heating pillow. Contact Customer Service for a new copy of the pattern.
Revised 8/28/2014
The amount of yarn to buy in MC Raindrop 25326 is 3 balls, not 2.
Chart Key
C3F-M1
Sl3 sts to CN; hold in front, K1, M1, K1, K3 from CN
Added WS descriptions for SKP/K2TOG
Antler Chart
Updated rows for in the round and flat knitting
Revised 3/17/2017
Legend and charts updated with corrected symbols; please contact Customer Service for an updated version of the pattern or download the newest version from your library.
In the Right Front section, in the Neck Shaping sub-section, the first sentence should read "At the same time, work 30 (28, 28, 30, 32, 32) rows from underarm BO..."
This also applies to the Left Front section in the same sub-section.
Under Body, after ribbing and Row 1 (setup row)
Row 2 (WS): Slip1, k1, (p1, k1) 2 times, k1, p2, (k1, p1) 2 times, p2, k2, SM, p to 2nd marker, k2, p2, (p1, k1) 2 times, p2, k1, (k1, p1) 3 times.
Revised 8/6/2014
The Argyle Boyfriend Cardigan is missing the Argyle Stitch Chart. Contact Customer Service for the updated pattern which includes the chart.
Directions......
Next Round: P2, work across Butterfly Chart, P2; repeat on back of sock. Work to end of chart. Purl three rounds.
Note: Though the Butterfly chart is written over 30 sts, it is worked over 26 sts of the sock. The other four sts are added in the second row and removed in the last few rows. Two purl sts should be worked on either side of the chart, all the way up.
Row 8: K3 (YO, K1 from dropped YO2, all 7 strands except for 1st pattern repeat, which has 9 strands because of the CO, pass YO over this k stitch then slip to left needle and k again making a long loop, k, pass long loop over stitch, k2) 6 times.
Bodice (both front and back) for size 34, Dec row should be: K4, sl 1, k8, ssk, sl 1, k2tog, k8, sl 1, k9, ssk, sl 1, k2tog, k9, sl 1, k8, ssk, sl 1, k2tog, k8, sl 1, k4; 6 sts dec’d—71 sts.
Chart - Row 19, stitches 7-14 should read:
Stitches 7-10: c2 over 2 right P
Stitches 11-14: c2 over 2 left P
Chart has been updated in new version of pattern
Revised 2/20/09
Cable Chart:

Revised 4/16/08
If your pattern was purchased prior to 4/16/08 please contact customer service at 1-800-574-1323
Revised 10/20/09
Front Bands
With smaller circular needles, beg at lower left front: pick up 46 (50, 54) sts (on holder), pm, 104 (118, 132) sts on left front, 4 sts along back left neck, 22 sts of back neck, 4 sts along back right neck, 104 (118, 132) sts on right front, pm, 46 (50, 54) sts (on holder): 330 (366, 402) sts.
Revised 4/30/08
Upper Left Front
From WS with wider end of cabled band on the left, p up 42 (46, 50) sts along upper edge, just beneath the selvedge.
Lower Left Front P up 42 (46, 50) sts along lower edge, just bebeath the selvedge.
2/7/12
Under Yoke:
Continue to decrease 8 st every other row, continuing in cable pattern, 29 (30, 32, 30, 34, 34, 36) times more. Work raglan decreases on the fronts and both edges of the back only every row 0 (0, 2, 9, 10, 14, 14) times.
12/9/11
If you purchased this pattern prior to 12/9/11 please contact Customer Service for a revised pattern.
Revised 5/21/2015
The sleeve charts were revised for clarification. Please download a new copy of the charts from your library or contact Customer Service for an updated copy.
Revised 2/24/2016
Changes are in bold.
Last paragraph of the Armholes header, just after the underarm BO: 100 (116, 130, 140, 150, 164, 176, 190, 192) sts remain across both Front and Back. Place Back sts on scrap yarn or a stitch holder.
Under the Front section, in the Shape Armholes header, the first Double decrease row and following Single decrease row have been combined into just one line, a Double Decrease Row with new numbers.
Work an Armhole Double Decrease Row every row 3 (4, 4, 6, 7, 7, 9, 12, 12) times.
[Work 4 (2, 2, 2, 2, 2, 2, 2, 2) rows even and then Single Decrease Row once] 1 (2, 3, 3, 3, 3, 3, 2, 3) times.
Shape Neckline:
Work a Neckline Double Decrease Row every row 3 (4, 5, 4, 4, 5, 6, 6, 6) times; work a Neckline Single Decrease Row every row 7 (6, 7, 8, 9, 9, 8, 8, 8) times, then every other row 7 (6, 7, 9, 10, 8, 8, 7, 7) times, then every third row 0 (3, 0, 0, 0, 2, 2, 2, 2) times, then every fourth row 1 (0, 1, 1, 0, 2, 2, 2, 2) times. Work 15 (16, 16, 12, 13, 2, 2, 4, 4) rows in pattern.
21 (23, 25, 26, 27, 31, 32, 31, 31) sts have been removed from each front; 15 (17, 21, 21, 22, 25, 27, 30, 30) sts remain on each shoulder.
Right Shoulder:
Short Row 1 (RS): Work in pattern to 4 (5, 6, 6, 7, 8, 8, 10, 10) sts before the end of the Right shoulder; W&T.
Back:
Work in pattern across 17 (20, 23, 23, 24, 27, 29, 32, 32) sts, BO the next 52 (56, 60, 62, 64, 72, 74, 72, 72) sts, then work in pattern to the end of row.
Early versions of pattern had the chart missing. Updated versions with chart should now be in your pattern library
Chart Legend
knit tbl
RS: Knit through back of loop
WS: Purl through back of loop
08/27/2020
Diamond Decrease Chart
Row 1, stitch 2: SSK
Row 1, stitch 69: K2tog
Row 3, stitch 3: SSK
Row 13, stitch 11: SSK
Row 13, stitch 59: K2tog
Row 15, stitch 13: SSK
Row 15, stitch 57: K2tog
Row 17, stitch 14: CDD
Row 17, stitch 55: YO
Row 29, stitch 25: SSK
Row 29, stitch 45: K2tog
Row 31, stitch 27: SSK
Row 31, stitch 43: K2tog
Rows 33-34, stitch 27: Knit
Rows 33-34, stitch 43: No stitch
Written pattern has also been updated for clarity (no errors). Get updated pattern/chart by downloading updated PDF from your pattern library.
03/27/2019
Diamond Decrease Chart
Row 3, sts 15-16: YO, ssk.
Row 23, st 32: K.
4/13/2017
Chart legend
SSSK symbol should match the symbol on Row 11, column 9 on Diamond Decreases Chart.
Revised 2/15/11
Sleeve Repeat chart
Work from this chart between the Right and Left halves of the Sleeve Increase chart. Sizes 31 and 49: Begin reading from round 9; all other sizes begin reading at round 1.
This pattern was entirely updated, rewritten with expanded sizes and new sample, in September 2022.
revised 2/5/2010:
Back
After decreases: Work 30 (29, 19, 33, 40, 42) rows in pattern.
Loosely CO 56 (64, 72)
Pg 41 of printed book and eBook, Pg 8 of download pattern:
Twin Leaf Lace chart was missing SSK and K2tog symbols in border; written pattern was correct. Contact Customer Service for an updated pattern.
Revised 3/14/13
Foot
Rnd 1: K2, P1, work Tanbark Stitch over 22 (26, 30) sts, P1, K2 (top of foot sts), PM to mark sole sts, K20 (24, 28). 28 (32, 36) sts at top of foot, 20 (24, 28) sts at sole. (Largest st count is 28 instead of 30.)
Row 1 should read:
Row 1: Sc in 2nd ch from hook, sc across, chain 1, turn
Row 3 should read:
Row 3: Repeat Row 2...
CANDLE FLAME SHAWL - 50465
Revised 1/9/13
Revised 5/11/06
Click here for PDF of revised pattern.
Revised 7/15/19 with the following written rows updated:
Row 3: P6, *K1, SSK, YO, K3, YO, K2tog, K1, P11; rep from *, end last rep P6.
Row 15: K2tog, *K1, YO, K2tog, K2, P3, YO, K1, YO, P3, K2, SSK, YO, K1, CDD; rep from *, end last rep K2tog.
Row 17: K2tog, *YO, K2tog, K2, P4, YO, K1, YO, P4, K2, SSK, YO, CDD; rep from *, end last rep K2tog.
Row 33: K1, *YO, P3, K2, SSK, YO, K1, CDD, K1, YO, K2tog, K2, P3, YO, K1; rep from *.
Row 35: K1, *YO, P4, K2, SSK, YO, CDD, YO, K2tog, K2, P4, YO, K1; rep from *.
Body Chart
Row 6, columns 9-12 - c2 over 2 left
Row 14,columns 9-12 and 17-20 - c2 over 2 left
Revised 2/25/2015
In Cowl section, after Row 10, the next paragraph should read "Then work Rows 1-8 once. Total of 198 (198, 208, 208, 218, 218, 228, 228, 228) rows worked in pat..."
The Prepare Cowl and Pick Up for Yoke diagrams have now been included. Download a new copy of the pattern from your pattern library to see the diagrams or email customer service for a new copy.
Body
...
Cont in St st and rep Inc Rnd every 16 rnds four more times.
Revised 5/12/2016
The final stitch counts for the shawl sizes should be 144 (224).
Leg Chart - legend
c2 over 1 right P - Sl1 to CN, hold in back. K2, p1 from CN;
Revised 7/5/2016
The 3rd sentence has been changed to read (changes in bold): "Next round, work four sts in established pattern, PM. This will mark the new beginning of round."
Updated 05/09/2017
1/1 LPC
WYIF, purl into back loop of second stitch on LH needle, bring yarn to front of work, knit in front loop of first stitch on LH needle, drop both sts off of LH needle
Written instructions
Row 10: P3, [1/1 RPC, P2, 1/1 LPC x2, P2, 1/1 RPC] 3x, 1/1 RPC, P2, 1/1 LPC, P3
Key
1/1 RPC, 1/1 LPC symbols were switched.
Chart
Row 16, Sts 11-14
1/1 RPC, 1/1 LPC
Left Mitt chart
Row 13, columns 8-9 should be 1/1 LTp
Right Mitt chart
Row 13, columns 8-9 should be 1/1 LTp
Body
Row 2 (WS) – last 4 words: work right edge cable.
Raglan
Row 1 (RS): ... 8 sts dec.
Chart Legend
Cable 2 Over 3 Left (2/3 LC)
Sl2 to CN, hold in front; K3, K2 from CN
Yarns used are: MC Down Heather 26296, 1 skein; C1 Persimmon 27233, 1 skein; C2 Flagstone Heather 26284, 2 skeins.
Revised 10/22/2019:
Under Cuff
Sizes 8 (9, 11)" Only
Join MC and work Rnds 1-2 six times. Cut MC.
Size 10" Only
Join MC and work Rnds 1-2 six times; inc 2 sts evenly
across last rnd. 70 sts. Cut MC.
Chart has been updated with correct stitches on rows 2, 4, 6, 9, 11, and 13.
CHECKS AND CHARMS HAT AND MITTEN SET - 50428
Revised 12/08/05
Hat:
Rnd 1 (all sizes): K.
Rnds 2-6: K.
Rnd 7: P.
Rnds 8-11: K.
Rnds 12-32: Work the first 20 rnds of the charted border pattern, stranding the extra yarn loosely on the inside.
CHEMO HAT - 50411
Revised 12/12/06
Short Row Shaping Sequence:
Knit to 2 sts before marker. Yfwd, sl1, bring yarn to back, **return wrapped st to LH needle**, turn work. P back to 2 sts before marker, being sure to keep the wrap around the slipped stitch loose. Bring yarn to back, sl1, yfwd. **Return wrapped st to LH needle**. Turn work and K back.
Updated charts and armholes/shoulders and back - please download current version or call 1-800-574-1323 for an updated version
revised 6/30/2009
Chart Legend now includes instructions for WS:

Chinook Shawl Charts 2 and 5: Even-numbered rows refer to the RS; Odd-numbered rows refer to the WS.
Revised 1/12/2016
Charts E1 and E2 were not included originally. They have now been added to the ebook, individual pattern file, and the printed book. If you bought a copy of the pattern, ebook, or book without the charts, please contact Customer Service for a copy of the charts.
This pattern was entirely updated, rewritten with expanded sizes and new samples, with a different construction, in September 2022.
Revised 1/11/12
Sleeve Cap Shaping
Size 46: Work a Double Decrease row every row twice; work a Decrease row every row 7 times, then every other row 4 times, then every third row 3 times, every other row 3 times, and every row 8 times; work a Double Decrease row every row twice. BO remaining 28 sts.
revised 9/9/2010
Work an increase round:
*K1, M1L, K to last instep st, M1R, K1; Repeat from * on heel side.
revised 01/18/2017
Updated cast-on for clarity
Under Toe
Work in St st until the instep stitches touch the front of your ankle when tried on while still on the needles.
Revised 12/13/2018
Body Decrease secion, second set of decreases:
sizes 32, 36, 44, 48, 60, 64: P2tog in the purl section after the last repeat. Complete the current 4-row repeat, then work two more 4-row repeats. 4 (5, 4, 5, 6, 5, 6, 7, 7) sts removed.
Revised 3/12/13
In chart legend, definition for Decrease 5 should read:
Sl 4 sts to RH needle. *Pass 2nd st on RHN over the first (center)st, then pass this center st back to LHN. Pass 2nd st on LHN over the center st. Pass center st back to RHN* and repeat between *s once more; pass 2nd st on RHN over center st. Leave st on RHN.
Revised 10/2/2014
In the Body section, for the Body Repeats, it should read:
All sizes: *(P 3 (3, 4, 4, 4, 5, 3, 3, 4), work Center section of Body Repeat chart); repeat from * 13 (16, 16, 17, 20, 20, 24, 25, 25) times total, (P 3 (3, 4, 4, 4, 5, 3, 3, 4).
Sizes 32 (44, 60, 64): Work across last section of Body Repeat chart, Purl 2 selvedge sts.
6/18/2019:
Row 9: K4, SM, *K3, (K next st, (slip the stitch just knitted back onto left needle and knit it again TBL) three times). Repeat from * across until 3 sts before marker, K3, SM, K4.
Row 11: K4, SM, K1, *(K next stitch, (slip the stitch just knitted back onto left needle and knit it again TBL) three times), K3. Repeat from * across until there 2 sts before marker, (K next stitch, (slip the stitch just knitted back onto left needle and knit it again through back loop) 3 times), K1, SM, K4.
7/17/2014:
Final lines of the pattern should read:
Work 7 rows in garter stitch.
BO all stitches loosely.
From Lace Stitch Pattern section:
Row 1(RS): K1, *yo, sl1, K1, psso, K7, K2tog, yo, K1; rep from * to end.
Row 3:K2, yo, sl1, K1, psso, K5, *K2tog, yo, K3, yo, sl1, K1, psso, K5; rep from * to last 4 sts, K2tog, yo, K2.
Row 5:K3, yo, sl1, K1, psso, K3, *K2tog, yo, K5, yo, sl1, K1, psso, K3; rep from * to last 5 sts, K2tog, yo, K3.
Row 7: *K1, K2tog, yo, K1, yo, sl1, K1, psso; rep from * to last st, K1.
Row 9: K2tog, yo, K3, *yo, sl1, K2tog, psso, yo, K3; rep from * to last 2 sts, yo, sl1, K1, psso.
Row 11: K4, K2tog, yo, K1, yo, sl1, K1, psso, *K7, K2tog, yo, K1, yo, sl1, K1, psso; rep from * to last 4 sts, K4.
Row 13: K3, K2tog, yo, K3, yo, sl1, K1, psso, *K5, K2tog, yo, K3, yo, sl1, K1, psso; rep from * to last 3 sts; K3.
Row 15: K2, K2tog, yo, K5, yo, sl1, K1, psso, *K3, K2tog, yo, K5, yo, sl1, K1, psso; rep from * to last 2 sts, K2.
Diamond Trellis Pattern
Rnds 3 & 7 end with "to last st, YO, K1."
Rice Stitch Pattern
Row 2 (WS): K.
Crown
With one DPN,CO 8 sts. Divide the sts onto 4 needles, leaving one as the working needle, PM. Join the round, being careful not to twist.
Brim
Increase in the same sequence as before until there are 176 (192) sts on the needle
Regular size only:
*K14, M1*; rep to end of round (120 sts)
*K15, M1*; rep to end of round (128 sts)
*K16, M1*; rep to end of round (136 sts)
*K17, M1*; rep to end of round (144 sts)
*K18, M1*; rep to end of round (152 sts)
*K19, M1*; rep to end of round (160 sts)
*K20, M1*; rep to end of round (168 sts)
*K21, M1*; rep to end of round (176 sts)
Large size only:
*K22, M1*; rep to end of round (184 sts)
*K23, M1*; rep to end of round (192 sts)
Updated to include the chart for the cherries trim option in the Shelf and Curtain trim pattern. Contact Customer Service for a copy of the chart.
This pattern was entirely updated, rewritten with expanded sizes and new sample, in September 2022.
1/12/2010:
After sleeves are attached, 138 (154, 162, 178, 182, 182, 202) sts remain.
Under Neckline:
Row 7: (Sizes 36-56 only)Work as a decrease round until 2 sts before wrapped st; W&T.
Row 8: Purl around body until 2 sts before wrapped st; W&T.
Repeat rows 7-8 0(0, 1, 2, 2, 2, 3) more times. 114 (122, 122, 130, 134, 134, 146) sts remain.
Orca Body
Row 150: BO 11 sts, work to end.
Row 151: BO 11 sts, K2tog, K4, K2tog.
After the last row on each side, BO all sts.
Revised 11/4/08
Optional Short Rows Short Row 1:
Knit up to 3 stitches before the left underarm marker.
Wrap and Turn (W&T)
Short Row 2:
Keeping the yarn wrap loose, purl back to 3 stitches before the right underarm marker, W&T.
Revised 3/2/2010
Yarn:
Elegance (70% Baby Alpaca, 30% Silk; 110 yds/50 gm ball):
Redwood 23535, 3 balls
Barn Red 23527, 3 balls
Gauge: 26 sts and 33 rows = 4” in pattern stitch on size 7 needles, or size necessary to obtain gauge.
Under Notes:
When working charts read WS rows (odd numbers) from left to right, and RS rows ( even numbers) from right to left.
After picking up stitches being held for left front:
Next Row: BO 37 (42, 39, 40, 41, 46, 44) st, P remaining 30 (31, 37, 41, 45, 47, 53) sts and place them on holder
Revised 1/7/2015
The full Raglan Shaping Chart is now included. Download the new version from your library or contact Customer Service for a copy if you bought the printed book.
3/29/2018
Pine Bark Increase Chart & Legend
Updated with increases symbols.
12/20/2018
Sleeve Chart updated - last column of each size removed.
Chart Legend
sl1 k2tog psso
Slip 1, k2tog, pass slip stitch over
(removed k2tog at end)
This pattern was entirely updated (re-edited, parts of it heavily re-written, new photo and layout) in September 2022.
9/26/18:
Notes
2x2 Rib (worked over multiples of 4 sts)
All Rnds/Rows: *P2, K2; rep from * to end.
Sleeves
Sizes - (43, 49.25, 55.5, 61.5, 67.75)” Only
Gusset Part 1
last paragraph before Resume All Sizes
Rep Rows 1–6 (don't place new Ms) another - (0, 0, -, 0, 1) time(s). Rep Rows 3–4 once more. - (35, 39, -, 47, 57) sts; - (5, 5, -, 5, 8) gusset sts each side; - (25, 29, -, 37, 41) sole sts.
(ebooks and pattern downloads were updated before release; error is only in printed book version)
Revised 7/5/2016
A note has been added to the Collar section to clarify which edges to pick up sts on: "Note: For horizontal stripes, PU sts along the CO and BO edges. For vertical stripes, PU along the selvedge edges."
Revised 5/2/2012
After instructions for picking up border:
Though the edge could be worked in the round, it is worked flat to keep an even garter gauge. Turn work to begin the next row.
Border Row: *K1, KFB, K to 1 st before next marker, KFB, K1, SM; repeat from * to end of row: 8 sts increased, 358 sts overall.
Next row: Loosely BO all sts, using larger needles if necessary. Be sure that the bind off matches the stretch of the rest of the fabric.
Continue with Finishing directions.
This pattern was entirely updated (re-edited, new photos and layout) in September 2022.
2/8/2017:
In the Thumb Hole and Top Decreases section, the instruction "On the next row, separate the two sides: k2tog, knit to 2 sts before marker, SSK, removing marker." has been change to knit to 2 sts before marker, instead of knit 1.
See updated version in your library for multiple changes. If you have questions, contact Customer Service at (800) 574-1323.
Chain 161 sts.
Revised 1/25/2016
Repeat Row 2 and 3 until you have a total of 36 rows (not including the Row 1 of sc stitch).
Revised 11/14/2016
When switching to color 2, it should be done on row 37. Repeat Rows 2 and 3 until you have a total of 36 rows of Color 2. Repeat this process for Colors 3 and 4.
revised 9/17/08
Staghorn Cable Legend:
c2 over 2 right
RS: sl2 to CN,hold in back, k2, k2 from CN
c2 over 2 left
RS: sl2 to CN, hold in front, k2, k2 from CN
Pattern:
R1: (RS): p2,k4,c2 over 2 right, c2 over 2 left, k4, p2
R2: (WS): k2, p16, k2
R3: p2, k2, c2 over 2 right ,k4, c2 over 2 left, k2, p2
R4: k2, p16, k2
R5: p2, c2 over 2 right, k8, c2 over 2 left, p2
R6: k2, p16, k2
Wrapped Stich Pattern (flat over a multiple of 4 sts plus 1)
Row 1 (RS): (K2, Sl2 WYIF, bring yarn to back, Sl sts back
to LH needle, K these 2 sts) to last 5 sts, K5.
Row 3: K4, (Sl2 WYIF, bring yarn to back, Sl sts back to
LH needle, K these 2 sts, K2) to last st, K1.
Revised 2/10/2016
On the chart for the mitten palm, the positions of the Right Hand Thumb and Left Hand Thumb captions should be reversed, so that the Left Hand Thumb is on the left and the Right Hand Thumb is on the right.
Revised 1/7/2015
In the Shaped Sides section, the first sentence should read "Work 2 (2, 4, 4, 5, 5, 8, 11, 11) rounds in St st..." and the Increase Round should be worked every 9th round 4 times. 150 (170, 190, 210, 230, 246, 266, 286, 302) sts.
Revised 11/10/2015
Sleeves
Work in Twisted rib for 2”. Switch to larger needles.
Revised 2/17/2016
All corrections are in red.
In the Back section the very first paragraph at the top of page 5 on the individual pattern (page 26 for the ebook/printed book), should read 61 (69, 71, 77, 79, 81, 83, 85, 85) sts.
Then, further on in the Back section:
The 4th sentence down in the same section starts with "Work in pattern across 11 (15, 15, 17..." - the number of BO sts should read "...BO the next 39 (39, 41, 43, 43, 43, 43, 45, 45) sts, then work in pattern...".
The second sentence of the Collar section instructions should read: "...PU and K 3 sts to the bound off sts at the back neck, 39 (39, 41, 43, 43, 43, 43, 45, 45) bound off sts across the neck, 3 sts...".
The final stitch counts for the Collar will be: 88 (88, 92, 94, 96, 96, 98, 100, 100) sts.
Revised 6/22/2016
In the Sleeve section (all changes are in red):
Continuing in pattern, work Inc Rnd every 9th (8th, 6th, 7th, 7th, 6th, 6th, 6th, 6th) round 10 (11, 15, 13, 14, 16, 16, 17, 15) more times. 69 (71, 81, 81, 87, 95, 95, 97, 97) sts.
Work 4 (7, 6, 9, 2, 4, 7, 3, 15) rounds in pattern, or desired length to underarm.
Sleeve Cap
Continuing in Sleeve Chart pattern between markers, shape sleeve cap: Stitches are bound off at the base of the sleeve cap. The cap is then worked flat to the end.
Work to 3 (3, 3, 3, 3, 4, 4, 5, 4) sts before the end of the round.
BO the last 3 (3, 3, 3, 3, 3, 4, 4, 5, 4) sts of the round, then the first 5 (5, 5, 5, 5, 6, 6, 7, 6) sts of the next round.
In the Sleeve section just before the Body section:
Work a Double Decrease Row every row 1 (1, 1, 2, 2, 2, 2, 1, 1) times. 15 (17, 19, 17, 17, 19, 19, 19, 19) sts.
BO all remaining sts.
The schematic measurements for B, the sleeve length, have changed to 17 (17.5, 17.5, 18, 18, 18, 18.5, 18.75, 18.75)".
Two definitions have been added to the Notes section:
K3tog: knit 3 sts together.
P3tog: purl 3 sts together.
Revised 01/12/2016
Sleeve section:
Start sleeve pattern
Set-up Rnd: Change to larger needles
Revised 10/22/2019
Armhole Single Decrease Row:
RS: K2tog, work in pattern to last 2 sts, SSK.
WS: P2tog TBL, work in pattern to last 2 sts, P2tog.
Row 1: 3 double crochet in 4th stitch from hook. Skip next 3 stitches, single crochet in 4th stitch. *Chain 3. Make three 3 double crochet in that same single crochet stitch. Skip the next 3 stitches, single crochet in the next stitch. Repeat from * to the end of the row. When you have two stitches left, end with a single crochet in the last stitch.
Row 2: Chain 3 and turn. Make 3 double crochet in the final single crochet of the previous row (the same stitch as the chain 3 just made). Single crochet in the next chain 3 space (the space created between the chain 3 and 3 double crochet cluster of the previous row) *Chain 3, make 3 double crochet in that same chain 3 space. Single crochet in the next chain 3 space. Repeat from * across the row. End with a single crochet in the last chain 3 space.
For Charts:
The gray squares are the area of increases and decreases as described in the right column on top of page 74. This space is going to gradually grow from the single stitch cast on to the center depth and again decrease to a single stitch for the bind off. These stitches should be worked in garter stitch, knit on both sides.
Decrease Section:
No stitches decreased in rows 1-8
Row 9: Ssk, k to marker, sm, k1, yo, sssk, k to marker, sm, k1, yo, ssk, k2. (2 sts dec.)
Row 2 (RS): Skip first 2 sc, *3 dc in next sc, skip 1 sc, 1 dc in next sc, skip next sc, repeat from * across; 3 dc in last sc; ch1, turn
Revised 10/18/2016
Mitered Linen Stitch in the round
Round 1 should have the asterisk in front of the first KFB: "Round 1: *KFB, (Knit 1, slip 1 with yarn in front)..."
Last line of pattern should be "To mount, slide curtain onto a 1” tension rod and set inside window. "; the rest of the text should be ignored. Pattern and eBook are now correct.
12/19/22:
The pattern was updated for clarity with a new construction diagram added. No actual errors were corrected. Only the individual PDF was updated; if you own the Chalet book or ebook please contact customer service for the updated pattern PDF.
3/15/2021:
Measurements added to schematic
long rectangle CO edge: 15.75 (22, 29.5, 36)"
long rectangle total length: 41.75 (58.25, 69.75, 83.5)"
side panel CO edge: 12 (12, 14.5, 14.5)"
side panel length: 16.25 (23, 29, 35)"
2/17/2021:
Side Panel
Row 42: *K3, P4, K1*, K3,...
Gusset
Rnd 9: (K2, P2) to 3 sts before M, K2, P1, M1R, SM, K2, SM, M1L, P1, K2, P2. 2 sts inc.
Revised 2/16/2016
In the Medallion Chart, round 21, the last 15 sts should be 2/2 RPC, 2/2 LPC, 2/2 RPC, p3.
In the Cable Panel chart, row 25 should be P3, 2/1 RPC, 2/2 LPC, p1, 2/2 RPC, 2/1 LPC, p3.
In the legend, two cable symbols and definitions weren't included. They are:
2/1 LPC: Sl 2 sts to CN and hold in front of work, P1, K2 from CN.
2/1 RPC: Sl 1 st to CN and hold in back of work, K2, P1 from CN.
Revised 3/7/2016
Medallion chart: Rnd 8, stitches 24, 25, 27, 28 (the 1/1 cables on the previous round) should be knit, not purl.
Cable Panel Chart: Rows 22 and 24, stitch #18 should be purl
In the Legend, in the far right column, the third stitch from the bottom is 2/2 LPC not 2/2 RPC
Contact Customer Service for an updated version of the charts, or download the newest version from your library.
Revised 7/22/2016
In the chart legend, the instructions for the purl stitch should read RS: purl stitch, WS: knit stitch. The instructions for the knit stitch should read: RS: knit stitch, WS: purl stitch.
Revised 9/6/2017
Chart Legend:
2/2 RPC
sl2 to CN, hold in back. k2, p2 from CN
2/2 LPC
sl 2 to CN, hold in front. p2, k2 from CN
Revised 6/19/09
The written instructions for these rows have been corrected:
Row 7: *K2, p3, k2, p6, k2, p3, k2, p2, C6B, p2, rep from * to end
Row 22: *K2, p2, C1BP, p6, C2FP, p2, k2, p2, k6, p2, rep from * to end
Row 25: *RT, p2, k2, p2, k4, p2, k2, p2, RT, p2, (k2, p2) twice, rep from * to end
Row 26: *K2, p2, k2, p2, (RT) twice, p2, (k2, p2) four times, rep from * to end
The charted instructions remain correct.
Revised 2/20/09
If you ordered this pattern prior to 2/20/09, please contact Customer Service for a revised pattern.
Needles
US 7 (4.5 mm), US 8 (5.0mm) 24” or longer circular
Page 5:
Next Row: BO 9 (10, 11, 11, 13, 14) sts, P to end.
Next Row: BO 9 (10, 11, 11, 13, 14), *K to marker, sl m, ssk, k to 2 sts before marker, k2tog, sl m, ssk, rep from * 1 time more, K to end of round.
Next Row: P
Next Row: *K to marker, sl m, ssk, k to 2 sts before marker, k2tog, sl m, ssk, rep from *1 time more, K to end of round.
Repeat these last 2 rows 0 (0, 0, 1, 1, 2) times more.
2x2 Rib (worked in the rnd over a multiple of 4 sts)
Rnd 1: (K1, P2, K1) to end.
DIAGONAL RIBBED PULLOVER - 50612
Revised 02/20/08
Front
CO 122 (146, 170) sts.
Set up row (WS): (p2, k2) 7 (10, 13) times, pm, (p2, K2) 16 times, p2, pm, (k2, p2) 7 (10, 13) times.
Chart 2 missing symbols:
Rnd 109: [K2tog, K5, SSK, YO, K1, YO] 10 times
Rnd 111: [K2tog, K3, SSK, YO, K3, YO] 10 times
Rnd 113: [K2tog, K1, SSK, YO, K5, YO] 10 times
DIAMOND LACE CARDIGAN - 50453
Revised 6/22/06
Please download these charts to help clarify specific instructions.
Diamonds of Eos Chart Five-Sides - written instructions:
(corrections added in bold)
Row 1 (RS): Sl1, K3, SKP, K5, K2tog, YO, K1, YO, SKP, K2, (K3, K2tog, YO, K1, YO, SKP, K2), K3, K2tog, YO, K1, YO, SKP, K5, (CS), K5, K2tog, YO, K1, YO, SKP, K3, (K2, K2tog, YO, K1, YO, SKP, K3), K2, K2tog, YO, K1, YO, SKP, K5, K2tog, K3, Sl1.
Row 3: Sl1, K3, SKP, K3, K2tog, YO, K1, Nupp, K1, YO, SKP, K1, (K2, K2tog, YO, K1, Nupp, K1, YO, SKP, K1), K2, K2tog, YO, K1, Nupp, K1, YO, SKP, K3, (CS), K3, K2tog, YO, K1, Nupp, K1, YO, SKP, K2, (K1, K2tog, YO, K1, Nupp, K1, YO, SKP, K2), K1, K2tog, YO, K1, Nupp, K1, YO, SKP, K3, K2tog, K3, Sl1.
Row 5: Sl1, K3, SKP, K1, K2tog, YO, K1, Nupp, K1, Nupp, K1, YO, SKP, (K1, K2tog, YO, K1, Nupp, K1, Nupp, K1, YO, SKP), K1, K2tog, YO, K1, Nupp, K1, Nupp, K1, YO, SKP, K1, (CS), K1, K2tog, YO, K1, Nupp, K1, Nupp, K1, YO, SKP, K1, (K2tog, YO, K1, Nupp, K1, Nupp, K1, YO, SKP, K1), K2tog, YO, K1, Nupp, K1, Nupp, K1, YO, SKP, K1, K2tog, K3, Sl1.
Row 7: Sl1, K3, SKP, K1, YO, SKP, K1, Nupp, K1, K2tog, YO, K1, (K2, YO, SKP, K1, Nupp, K1, K2tog, YO, K1), K2, YO, SKP, K1, Nupp, K1, K2tog, YO, K1, (CS), K1, YO, SKP, K1, Nupp, K1, K2tog, YO, K2, (K1, YO, SKP, K1, Nupp, K1, K2tog, YO, K2), K1, YO, SKP, K1,, Nupp, K1, K2tog, YO, K1, K2tog, K3, Sl1.
Row 9: Sl1, K3, SKP, K1, YO, SKP, K1, K2tog, YO, K2, (K3, YO, SKP, K1, K2tog, YO, K2), K3, YO, SKP, K1, K2tog, YO, K1, (CS), K1, YO, SKP, K1, K2tog, YO, K3, (K2, YO, SKP, K1, K2tog, YO,K3), K2, YO, SKP, K1, K2tog, YO, K1, K2tog, K3, Sl1.
Row 11: Sl1, K3, SKP, K1, YO, Sk2p, YO, K1, K2tog, YO, (K1, YO, SKP, K1, YO, Sk2p, YO, K1, K2tog, YO), K1, YO, SKP, K1, YO, Sk2p, YO, K1, (CS), K1, YO, Sk2p, YO, K1, K2tog, YO, K1, (YO, SKP, K1, YO, Sk2p, YO, K1, K2tog, YO), K1, YO, SKP, K1, YO, Sk2p, YO, K1, K2tog, K3, Sl1.
Errata added 11/12/2019:
DIRECTIONS
Work Chart Five: Sides and Chart Five: Center Spine section
Work Side Chart Rows 1-12 once, then Rows 3-12 13 times.
Repeat Center Spine Rows 1-32 four times, then rows 1-14 once.
CHARTS
Chart Three: Row 11, Stitches 75, 76 = K2tog, YO
Chart Three: Row 27, Stitch 55 = Knit
Chart Six: Rows 23 and 25, Stitch 36 = Sl1, K2tog, PSSO
Chart Six: All RS rows through Row 23, Stitch 43 = Sl1, K1, PSSO
Chart Six: all Centered Double Decrease symbols (a straight, symmetrical upside-down V with a straight, centered vertical line) = Sl1, K2tog, PSSO
On Back Waist chart:
Decreases on right side of chart should be P2tog TBL, not P2tog.
Two 1/1 RPT cable crosses are missing: Row 29, stitches 36/37 and Row 33, stitches 35/36
Back Right Neck Shaping
Next Row (WS): Work 24 (27, 29, 31, 32, 35, 38, 40) sts in pattern, BO 20 (20, 20, 20, 24, 24, 24, 24) sts, work 24 (27, 29, 31, 32, 35, 38, 40) sts in pattern.
Place sts for left back on holder, continue work on right back.
Next Row: P 0 (3, 5, 7, 11, 14, 17, 19), work row 1 of Back Right Neck Chart.
Continue in pattern as established to row 7 (7, 7, 7, 9, 9, 9, 9) of Back Right Neck Chart.
Sizes 34, 46:
Next Row: P 0 (-, -, 7, -, -, -, -), work Row 7 of Back Right Neck Chart.
Sizes 38, 42, 50, 54, 58, 62:
Next Row: P 1, - (p2tog, p2tog, -, p2tog, p3tog, p3tog, p2tog), P - (0, 2, -, 8, 10, 13, 16), work row - (7, 7, -, 9, 9, 9, 9) of Back Right Neck Chart.
Repeat last two rows of chart 0 (2, 4, 4, 1, 0, 2, 3) times more.
Repeat row 6 (6, 6, 6, 8, 8, 8, 8) once more. 15 (17, 19, 22, 21, 23, 26, 29) sts.
Shoulder shaping remains unchanged.
Back Left Neck Shaping
Transfer Left Back sts from stitch holder to needles. Join yarn and begin working on RS row.
Next Row (RS): Work Row 1 Back Left Neck Chart in appropriate size, p to end of row.
Next Row (WS): K 0 (3, 5, 7, 11, 14, 17, 19), work next row of Back Left Neck Chart. Continue in pattern as established to row 7 (7, 7, 7, 9, 9, 9, 9) of Back Left Neck Chart.
Sizes 34, 46:
Next Row: Work Row 7 of Back Left Neck Chart, p to end of row..
Sizes 38, 42, 50, 54, 58, 62:
Next Row: Work row - (7, 7, -, 9, 9, 9, 9) of Back Left Neck Chart, p to last – (3, 3, -, 3, 4, 4, 3) sts, - (p2tog, p2tog, -, p2tog, p3tog, p3tog, p2tog).
Repeat last two rows of chart 0 (2, 4, 4, 1, 0, 2, 3) times more. 15 (17, 19, 22, 21, 23, 26, 29) sts.
Shoulder Shaping remains unchanged.
Section 1
Row 3: KFB, K4. 6 sts.
Diagonal Lace
Rows 2, 4, 6, 8, 10: P to last st, KFB. 1 st inc.
(clarifying, not an error)
Revised 5/17/2011
Gauge is incorrectly listed as being worked with two strands held together; the gauge is achieved single-stranded.
Pattern should be worked on 32-40" circular, not straight needles.
Section I should be color order C1, C5, C3, C1 (first version incorrectly had C2 instead of C3).
3/22/11
Cardigan Version
Shaping the armscyes
Move on to Cardigan Armscye and Neck Shaping charts. At round 133 in the chart, stitches are bound off for the armscyes. Work in pattern until 5 (7, 9, 12, 9, 10, 10) sts before the right underarm marker; BO the next 10 (14, 18, 24, 18, 20, 20) sts in pattern. Work to 5 (7, 9, 12, 9, 10, 10) sts before left underarm marker and BO the next 10 (14, 18, 24, 18, 20, 20) sts in pattern, then continue in pattern to the end of the round.
Revised 8/10/22
Midwinter Colorway Sleeve Continued chart was missing Rows 54-55. If you have the printed Best Of book please contact customer service for an updated pattern PDF. The other colorways were not missing any rows.
Revised 1/25/2012
Under Pullover Body Repeat: Sizes 36, 40, 44, 48 and Cardigan Body Repeat charts, text should read:
Read this chart ... from right to left.
There was a symbol missing in the chart Legend:
Symbol that looks like an upside-down V with a straight vertical line in the center, used on Rows 37 and 41 of Chart B = CDD: Slip first and second stitches together as if to K2tog; knit 1 stitch; pass 2 slipped stitches over the knit stitch
In Body Chart, Setup Row 1, Stitch 12 is M1P.
Bottom Panel
Waist to Armhole Slope
Beginning with next Rnd, 11, follow shaping instruction given below and at the same time at Rnd 11 (13, 15, 21, 21, 23, 25, 27) begin working Chart A Lace between two Back Ms.
Front
Next Row (WS): Sl 1, P 30 (34, 38, 42, 47, 51, 55, 59) sts...
With C1, CO 43 sts. K one row.
Revised 3/3/2016
Round 1 and Drop Row have been changed to:
Rnd 1 (setup row): RS K4 (YO, K2tog, K3) repeat parenthesis three times, YO, K2tog, K4.
Drop row: K4 (drop next st off needle, YO, K4), repeat parenthesis three times, drop next st off needle, YO, K5.
Large Cable
Row 34: K3, P4, c3 over 1 right P, P2, c3 over 1 left P, P4, K3.
Revised 4/3/2012
Corrected Almond in chart to Custard.
Revised 1/13/2012
Tranquil colorway: work I-cord trim in Conch.
Revised 8/21/2014
Definitions for the following abbreviations have been corrected:
cc = contrast color
cdc = crossed double crochet
ch = chain
sc = single crochet
Chart
Row 16 - stitch 10 - Purl
Row 18, stitch 59: Purl
This pattern was entirely updated, rewritten with expanded sizes and new sample, in September 2022.
9/25/17:
Yarn Requirements:
Knit Picks Wonderfluff (70% Baby Alpaca, 7% Merino Wool, 23% Nylon; 142 yards/50g): MC Cobblestone Heather 27187, 5 (5, 5, 6, 6, 6) balls
Revised 4/27/10
Berry Bobble Stitch, p. 10
Round 8: K3, *(K6, turn, P6, turn) 3 times, K6, rep from * to last 9 sts, work bet () once, K9.
Revised 3/22/10
Orange Wedge, p. 8
Chart Row 24: 1st st should be ssk in Daffodil, 2nd st should be k2tog in Daffodil.
Chart Row 26: Should be 1 st instead of 2; K2tog in Cloud.
Kiwi Slice, p. 9
Notes:
The Central Double Decreases must be worked using the last stitch of the preceding repeat in order to ensure that they line up. Stitch markers may help you follow the chart, but bear in mind that they will need to be removed and replaced to accommodate this.
Revised 3/17/10

Beet bag, page 2, left column:
Begin working from Round 1 of Beet Chart, and continue following chart through round 22. Repeat the chart six times around the bag.
Revised 12/7/2012
Toe
Round 2: K to 3 sts before M, K2tog, K2, SSK, K to end. 2 sts removed.
Revised 10/25/2012
Top Triangle
......
Beginning at the top point opposite the beginning of round at the cast-on, attach D and begin working from Top Triangle directions and Top Triangle Stripe Pattern diagram:
In schematic, sleeve length should be 17 (17.5, 17.5, 18, 18, 18.5)”
Slip all stitches purl-wise.
Stitch Pattern (worked flat over a multiple of 6 sts plus 1)
Row 1 (RS): With C1, K across.
Row 2 (WS): With C1, P across.
Row 3: With C2, (K3, Sl1 WYIB, K2) to last st, K1.
Row 4: With C2, (K3, Sl1 WYIF, K2) to last st, K1.
Row 5: With C2, (P3, Sl1 WYIB, P2) to last st, P1.
Row 6: Rep Row 4.
Row 7: Rep Row 1.
Row 8: Rep Row 2.
Row 9: With C2, (Sl1 WYIB, K5) to last st, Sl1.
Row 10: With C2, Sl1, (K5, Sl1 WYIF) to end.
Row 11: With C2, (Sl1 WYIB, P5) to last st, Sl1.
Row 12: Rep Row 10.
For the crochet border:
The second row should end with Sc32 instead of Sc33.
The last line of the crochet border should read **Repeat from * to ** along top edge five more times. Sk1 st, (1tr, ch3, sc) in next st.
EMMA JACKET - 50512
Revised 10/4/06
Yarn requirements: 15 (17, 19) balls
Chart A
Row 21, stitches 4 and 14 - Knit
revised 4/29/09
Lower Body
Place side markers:
K112 (126, 140, 154, 168), PM, k 112 (126, 140, 154, 168), PM.
Knit 11 rows.
Revised 3/12/09
If you purchased this pattern prior to 3/12/09 please contact Knit Picks Customer Service 800-574-1323 for an updated pattern.
Revised 9/18/2014
The same size needle is used for the whole project, so the direction to "With smaller needles, cast on..." has been removed. Cast on with the same size needle as you use for the rest of the piece.
Revised 9/23/2014
The previous errata of 9/18 was incorrect, and knitters will need a size 4 needle for the body and a size 7 circular needle for the CO and BO. Additional clarification for rows 41-300 has been added: "Working as established, repeat Chart rows 41-60 a total of 13 times for the center panel, while at the same time working full repeats of the outer motif sts 1-15, rows 41-64."
Revised 9/14/2016
In the Border section, BO all sts p-wise using larger needles.
There was a formatting error right after Row 2 of the Raglan Section.
The correct version should be:
Rep Inc Row every RS row 13 (13, 13, 13, 13, 13, 11, 7) more times. 202 (210, 216, 216, 216, 228, 212, 180) sts.
*Work 3 (3, 3, 1, 1, 1, 1, 1) rows even. Rep Inc Row every row 1 (1, 1, 2, 2, 2, 2, 2) times.*
Rep from * to * 0 (0, 0, 1, 5, 7, 8, 12) more times.
Rep Inc Row every RS row …
In chart, symbol for SSK should be \.
In Chart 2, Row 20, Column 6 should be No Stitch, not Knit
Pattern has been updated, please download newest version.
Chart 1
Row 6, stitches 3 and 4 should be Purls, not Knits.
Legend
No Stitch should not have Knit Stitch listed.
Revised 12/7/2020
Yardage requirements for MC yarn are: 5 (6, 7, 8, 9, 10, 10) balls.
Revised 04/02/2018
The Yoke Chart
row 56, column 10 is a knit stitch
Revised 10/28/2010
The Yoke chart has been revised to correct increases; please contact Customer Service for a new copy of the pattern.
Revised 3/6/12
In legend for Neutral colorway, the top color should be Thicket, not Bark.
Revised 7/20/2015
Color E and F have been changed. Color E is Anna 26760 (2 hanks) and color F is Oliver (1 hank).
revised 10/2/08
Needles:
US 2 (2.75mm) circular or DPNs
revised 8/6/08
Thermal Ribbing
Mult of 4 sts
Round 1: * K2,P1,K1; Rep from *
Round 2: *K1, P3; Rep from *
Revised 9/28/07
Men's sweater: use Textured Garter Rib Ladies' sweater: Seeded Garter Rib
revised 9/3/08
Right Leg
Work as for left leg reversing bottom shaping.
FAROESE PEAKS SHAWL - 50391
Revised 8/27/07
Center Gusset and Shoulder Shaping Rows: Row 19: sl1p wyif, k4, sm, yo, k31, yo, sm, k1, yo, k5, k2tog, yo, k3, yo, k2tog, k2, yo, ssk, k5, yo, k1, sm, yo, k31, yo, sm, k5. (101 sts)
Center Gusset Lace Repeat: From R 33 to R 200 you may either follow the line-by-line instructions below... If following charts, note that Row 25 is the shoulder shaping row. See written instructions for full explanation.
Row 219: sl1p wyif, k4, sm, yo, k2, [k2tog, yo, k3, yo, k2tog, k2, yo, ssk, k1] 41x, k2tog, yo, k3, yo, k2tog, k2, yo, ssk, k2, yo, sm, k5 - 519 sts.
Full Body Pattern CHART
Row 39
Stitch 26: SKP
Stitch 72: K2tog
FELTED BACKPACK - 50358
Revised 11/1/05
Base: Cast on 44 sts with 2 strands of Wool of the Andes and 1 strand Shimmer. Knit in garter stitch for 42 rows. Bind off. ... Body (charts on following page): Using crochet hook, begin at the center back, pick up 18 sts (Chart A), pm. ... Pick up 18 sts along the back (Chart A). ...
Special Abbreviations: c/f 2K: Place 2 knit stitches on cable needle and hold in front of work. ...
FELTED ENTRELAC TOTE - 50406
Revised 3/22/06
Top of Tote:
...
Knit 2 rounds with A, break yarn at end of second round. Knit 4 rounds with MC, break yarn at end of fourth round.
...
Rectangle Round:
...
Using MC: Row 1: With RS facing you, pick up 13 sts along the right side of the first triangle, turn. Row 2: P12, P2tog, turn.
(Note: P2tog is with 1 stitch from rectangle and 1 stitch from triangle) Row 3: Knit 13. Rep rows 2 & 3 until all triangle sts are used up, ending with Row 2. Break yarn.
Bottom Triangles:
...
With RS facing you and E, pick up 13 sts down the left side of first rectangle. Turn. Row 1: Sl1, p12, turn. Row 2: K to last stitch, sl1, k1, psso, using one st that was on the LH needle, turn. Row 3: Sl1, p to last two sts, P2tog, turn. Rep rows 2 & 3 until 3 sts rem, ending with Row 2. Next row: P2tog, turn, sl1, K1, psso, turn. Leave the rem st on the needle. With RS facing, pick up 12 sts along the next rectangle. Rep until you have a total of 10 triangles and your tote is off the needles.
Assembly:
Find the hole in the front and the back of tote. Insert the first handle from back to front and tie a small knot to secure. Rep for all ends.
Revised 1/08/09
Tote base:
...
Pick up and knit together with the stitch on the left needle and the bar from the last round worked.
FELTED PETAL BOWLS - 50531
Revised 6/13/07
(A) Felted Slouched Bud Vase (7 petals): 4 1/4" x 4 1/4"
(B) Felted Flower Pot: 3 1/2" x 4 1/4"
(C) Felted Rim Pot: 4 1/4" x 3 1/2"
(D) Felted Bud Vase: 4 1/4" x 3 1/2"
Half Pi
Repeat shown in brackets. [ ]
Chart A
Row 31: K5, [K10, (K1, P1) in same stitch, K10], K5.
Row 32: K5, [P22], K5.
Row 33: K5, [SSK, K18, K2tog], K5. (30 sts)
Row 34: K5, [P20], K5.
Row 35: K5, [YO, SSK, K16, K2tog], K5. (29 sts)
Row 36: K5, [P19], K5.
Row 37: K5, [K1, YO, SSK, K14, K2tog, YO], K5.
Row 38: K5, [P19], K5.
Row 39: K5, [K2, YO, SSK, K12, K2tog, YO, K1], K5.
Row 40: K5, [P19], K5.
Row 41: K5, [YO, SSK, K1, YO, SSK, K10, K2tog, YO, K2], YO, K5. (30 sts)
Row 42: K5, P1, [P19], K5.
Pi
Chart A
Rnd 31: K10, (K1, P1) in same st, K10.
Rnd 32: K22.
Setup rows: Written instructions are correct. On the chart, the YO, PB, YO on rows 1, 3 and 5 should be shifted one st to the right.
Corrected on pattern download and eBook.
Size 48" cast on should be 392 stitches
Revised 5/12/2015
The following measurements have been added to the schematic:
Upper arm 13.25 (15, 15.75, 17.5, 19.25, 21.75, 23, 24.75, 26.25)".
Lower arm 8.5 (8.75, 9.25, 10.25, 10.75, 12, 12.5, 13, 13.5)".
Hip 34 (39, 43, 46, 49, 54.5, 59, 63, 66)"
Waist 31 (34, 37, 40.5, 44, 51, 55.5, 59.5, 63.5)"
The bust measurement has been updated, so the finished bust measurements are now: 34 (38, 41.5, 44.5, 47, 54.5, 58.5, 61.5, 65)”
Body section
Armscyes
In the 2nd paragraph, the first 3 sets of numbers all have an extra number in them: "Work across the next round of the Body to 6 (6, 7, 8, 8, 14, 16, 16, 16, 22) sts before Right Underarm Marker; BO the next 12 (12, 14, 16, 16, 28, 32, 32, 32, 44) sts, removing marker. Continue in pattern to the last 6 (6, 7, 8, 8, 14, 16, 16, 16, 22) sts of the round...".
Size 44: "Work a Double Decrease Round every round three times; work..."
Size 52: "Work a Double Decrease Round every round six times; work..."
The Neckline and Body charts have changed significantly. Please re-download the pattern or contact customer service for an updated version.
Revised 9/23/2014
Pattern has been significantly revised. Find the updated copy in your library, or contact Customer Service for a new copy.
Daisies Pattern (worked flat, over a multiple of 4 sts +1)
Row 1 (RS): knit
Row 2 : k1, *Purl next 3 st tog (P3tog), leave sts on left needle, YO, P the same 3 sts tog, drop sts off left needle, k1, repeat from *.
Row 3: knit
Row 4: k1, p1, k1, * Purl next 3 st tog (P3tog), leave sts on left needle, YO, P the same 3 sts tog, drop sts off left needle, k1, repeat from *, end with p1, k1.
Updated 08/21/2018
Complete Rows 1-13 once, then rows 2-13 four times.
Updated 2/25/2015
Lines in pattern should read:
Row 8, 10, 12: K1(edge), slip 5 purlwise (yarn at back), *P5, slip 5 purlwise (yarn at back)*, repeat from * to * to last st, K1 (edge).
Row 13: K1(edge), *K2, K1 over the slipped sts (as before), K7*; repeat from * to * to last 6 sts, K2, K1 over the slipped sts (as before), K2, then K1 (edge).
Pattern download is now correct, please redownload.
Pillow
Border
Rnd 1: With C1, work one row of star stitch evenly around...
Finishing
Attach C1 to one corner
Revised 2/10/2016
All slipped stitches should be slipped with the yarn in front.
Revised 2/22/2016
Definitions added to the legend:
A red outline = pattern repeat
2/2 LC: Sl 2 sts to CN, hold in front. K2, K2 from CN.
Revised 5/4/2016
Rows 9 and 25, stitch columns 23-24, should be 1/1 RC.
Rows 9 and 25, stitch columns 67-68 should be 1/1 LC.
Contact Customer Service for an updated version of the chart.
Revised 5/12/2016
Rows 11 and 27, stitch columns 14 and 77 should be the purl symbol (knit on the WS).
Row 28, stitch columns 47 and 44 should be the purl symbol (knit on the WS).
Revised 5/25/2016
Rows 2, 18, 34: Sts 10 and 80 should be the purl symbol (knit on the WS).
Revised 5/9/2017
2/1 RCp
Sl 1 sts to CN, hold in back; K2, P1 from CN
Increasing V Chart
Rows 15-16: red line is only around the 3 right-most stitches for the repeat section; the yarnover does not get repeated across.
1) In the chart key the definition for p2tog tbl should read: “purl 2 stitches together through the back loop.”
2) The armhole borders are 4 stitches wide in stockinette. Under “Shape Back Armhole and Yoke” after “Next Row, (RS): …” the WS row instruction is missing. It should be: “WS: p4, maintain patt to last 4 sts, p4.”
3) Under “Shape Front Armhole and Yoke”, the single decrease section (4th paragraph) should read: “WS: p4, maintain patt to last 4 sts, p4.”
4)Under “Side Shaping” the last paragraph should read: Note: In the last dec rnd for size Small and the last 2 dec rnds for size Large, the dec will meet up with the purl channel of the Wide Rib pat at each end of the back. Maintain the 2-st purl channel and work the dec using the 2 knit sts next to it. After side decreases, 7 knit sts remain between purl channels for size Small; 3 for size Large, at each side bodice.
5) Under “Shape Front Armhole and Yoke, Sizes M and L only:…” change to this: Sizes M and L only: Work 4-st border, Wide Rib and 38-st Floral Lace Panel as follows: Row 1 (RS): k4, work Wide Rib for (4,6) sts, place marker, work row 1 of lace panel, place marker, work Wide Rib for (4,6) sts, k4. Row 2: p4, work Wide Rib to marker, sm, work row 2 of lace panel, sm, work Wide Rib to last 4 sts, p4. (54, 58) sts. Cont even in pat as established through RS row 23 of Floral Lace Panel.
Tip: In Chart A, a few rounds start and end with yarn overs, thereby resulting in double yarn overs. The common way to work double yarn overs is to knit the first and purl the second.
First printing was missing the definition for this increase:
RC 5/4
Slip 5 sts to CN, hold back, K4; K4, P1 from CN
Gauge
4 Clusters and 8.5 rows = 4 inches in pattern. Gauge is not critical for this project
Added to pattern:
Row 5: Ch 3, 1 dc in first st *skip 2 sts, 3 dc in next st; rep from * across, work 2 dc in last stitch. (49 clusters)
Row 7: Ch 3, 1 dc in first st *3 dc in space between clusters in previous row; rep from * across, work 2 dc in last stitch
Row 8: Ch 3, *3 dc in space between clusters in previous row; rep from * across, 1 dc in last st.
Change to CC8, work Rows 7-8
Change to CC7, work Rows 7-8
Under notes - Cables
3-st RPC: Sl 1 sts to CN and hold to back, K2, P1 from CN.
3-st LPC: Sl 2 st to CN and hold to front, P1, k2 from CN.
Under notes -
1x1 Twisted Rib (worked flat over an even number of sts)
Row 1 (RS): K1, P1, *K1 tbl, P1; rep from * to end of row.
Row 2 (WS): K1, *P1TBL, K1; rep from * to last st, P1.
Rep rows 1–2 for patt.
Chart C updated 11/19/2014 - if purchased the physical book, please contact customer service for a copy.
Chevron Chart has been updated. Please download new versions of the eBook or pattern in your Pattern Library. If you purchased a physical book, please contact customer service for an updated chart.
Revised 8/6/2014:
The legend for some of the cable stitches was cut off. The full descriptions are below.
c3 over 3 right P: sl3 to CN, hold in back, k3 then p3 from CN
c3 over 2 right P: sl2 to CN, hold in back, k3, then p2 from CN
c3 over 2 left P: sl3 to CN, hold in front, p2, then k3 from CN
Revised 6/18/2020:
Instructions following Collar Increase Row have been updated as follows to be more clear:
Work in Seed st, working increases as follows for as long as needed until there are 29 (30, 32, 32, 34, 34, 36, 36, 36) sts between the markers and the ends of the row: work a Collar Increase row every row 10 times, then every other row (if applicable).
Row 7: K3, work Eyelet Chart Row 1, K until 10 sts remaining, work Eyelet Chart beginning from Row 1, K3.
Row 8: K3, work Eyelet Chart Row 2, P until 9 sts remaining, work Eyelet Chart, K3.
Row 9: K3, work Eyelet Chart Row 3, K until 10 sts remaining, work Eyelet Chart beginning from Row 1, K3.
Row 10: K3, work Eyelet Chart Row 4, P until 10 sts remaining, work Eyelet Chart, K3.
Repeat Rows 7-10 until desired length is reached ending on Row 2 of the Eyelet Pattern.
Chart 6
Row 1, column 10: sk2p
Chart 6
Row 1, column 10: sk2p
Gaufrer Cowl Chart
Line 31 should read (from right to left):
purl 2, knit 4, Cable 2 back, knit 9, Cable 2 forward, knit 4, purl 2, knit 1
Revised 6/13/2013
Body Decrease Chart: directions underneath should read Repeat these 12 sts 9 (10, 12, 12) times.
Revised 4/2/2015
Back Armscye Decreases Continued Chart, size 44: on Row 1, sts 140-146 should be gray Placeholder (No Stitches) symbols. Size 44 begins on Row 2 (WS) with bound-off sts.
GENERATIONS PURSE - 50553
Revised 4/23/07
Row 9: K2, p1, k2tog, yo twice, skp, p1, k2, k2tog, yo, k4, yo, (slip 2 sts knitwise, k1, p2sso), yo, k4, yo, skp, k2, p1, k2tog, yo twice, skp, p1, k3.
Revised 7/25/2016
This note has been added to the Crown chart for clarity:
On rounds 2, 4 and 6 of the Crown chart, knit to one stitch before the marker (beginning/end of round). Work last stitch of round as part of the CDD on next round (3, 5 and 7).
Chart is missing from book version of the pattern. Please contact customer service for the chart.
revised 1/4/08
Written instructions:
Round 21 should read: *K1, T1R, k1, k2tog, yo, k1tbl, yo, [sl1, k2tog, psso], yo, k1tbl, yo, ssk, k1, T1L, k1; repeat from * to end of round.
Charted instructions:
Row #23, Stitch #10 should be an SSK (\), rather than a K (blank square).
Turn Heel instructions:
Skip Rows 2 and 3 and continue with Row 4 in the following manner. Row 1 (RS): Sl1 pwise, k18, ssk, k1, turn. new Row 2 (old Row 4): Sl1, p5, p2tog, p1, turn.
This only affects patterns bought between 1/4/08 and 10/24/08 Turn heel........ There should be 20 sts remaining in the heel flap.
Creating Gusset / Working Foot
With right side facing, knit 20 heel sts, pick up 16 sts along the slipped sts on the left side of the heel flap. Place marker. Knit next 34 instep sts from the holder, place marker. Pick up and knit 16 sts along the slipped sts on the right side of the heel flap. Knit 20 heel sts. Knit over next 16 gusset sts. This marks the beginning of your future rounds.
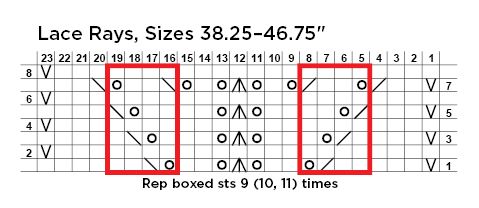
First printing had incorrect chart above, and missing notes about boxed stitch repeats for all charts, as follows.
Sun Lace
For sizes 38.25-46.75: Rep boxed sts 4 (5, 6) times.
For sizes 50.75-58.75: Rep boxed sts 7 (8, 9) times.
Lace Rays
For sizes 38.25-46.75: Rep boxed sts 9 (10, 11) times.
For sizes 50.75-58.75: Rep boxed sts 11 (12, 13) times.
Front Rays
Rep boxed sts 1 (2, 3, 3, 4. 5) times.
Each time Row 1 is worked, an additional rep will be added to each side of sleeve lace detailing and the number of St sts will be reduced within body. If using a M, place it after last RH side rep and before first LH side rep. Ms will need to be moved over 2 sts on chart Rows 1 and 5.
Revised 5/2/2018
Knot Chart legend has been updated to include wrong side instructions . Contact Customer Service for an updated copy of the pattern, or check your library for the newest version.
Revised 6/30/2015
In the Key, the plus symbol should mean a single crochet, rather than a slip stitch.
Toe Up Socks
Heel Flap
Row 1 (RS): K 32 (35, 41, 44, 47) sts, picking up remaining wraps, SSK, turn. 1 st dec
Row 2 (WS): *Sl1, p1* rep between ** 10 (11, 13, 14, 15) times, Sl1, p2tog, turn. 1 st dec.
revised 3/24/09
Body:
Rep inc round every 8 rounds 6 more times: 178 ( 198, 218, 238) sts.
Back:
(RS): BO 4( 4, 5, 6) sts at beg of next two rows. Dec 1 st at end of every row 8 (8, 9, 9) times: 73 ( 83, 90, 98) sts remain. Work even until armhole measures 7" ( 7 1/4", 7 1/2", 7 3/4" ).
10/9/2019
Fully updated October 2019, with all errata corrected.
Revised 3/4/2015
All changes are in bold.
In the Note section, "It is worked sideways by knitting all rows and utilizing short rows to shape the crown.
Directions
Consider the cast-on row to be a WS row; it is the pair to the RS row...first knit row is the RS row of the first Garter ridge..."
CO 11 sts in CC and 51 Sts in MC
Work from Gradual Rib chart starting on the RS of ridge 1...
...in the Gradual Rib chart, ending with the RS of ridge 26.
Graft Ends
...following the color pattern on ridge 26...
Yoke
Increase Section 1
...
Sizes - (-, 43.25, -, -)(57.5, -, -)" Only
Inc Rnd: K1, (M1, K3) six times, (M1, K2) - (-, 31, -, -)(35, -, -) times, (M1, K3) six times, M1, K1. - (-, 144, -, -)(156, -, -) sts.
3/15/2021:
Main Body
Row 3 and all RS rows: (K to M, SM, P1, SM) twice, K to end.
12/19/2019:
Right Front Shoulder
Rotate garment clockwise 180 degrees, PU 13 (14, 15, 16, 17, 18) sts on the end of Back Shoulder CO edge.
Setup Row (WS): P across.
Row 1, 3, 5 (RS): K across.
Rows 2 (WS): P8 (9, 10, 10, 11, 12), W&T..
Row 4: P3 (4, 4, 5, 5, 5), W&T.
Row 6: P3 (4, 4, 5, 5, 5), P wrap tog with wrapped st, P4 (4, 5, 4, 5, 6), P wrap tog with wrapped st, P4 (4, 4, 5, 5, 5).
 Sign up for our weekly emails
Receive the latest Knit Picks news, sales, new yarns, new collections and more!